
科技改變生活 · 科技引領未來
科技改變生活 · 科技引領未來

1、為什么要對nginx平滑升級隨著nginx越來越流行,并且nginx的優勢也越來越明顯,nginx的版本迭代也來時加速模式,1.9.0版本的nginx更新了許多新功能,例如stream四層代理功能,伴隨著nginx的廣泛應用,版本升級必
1、為什么要對 nginx 平滑升級
隨著 nginx 越來越流行,并且 nginx 的優勢也越來越明顯,nginx 的版本迭代也來時加速模式,1.9.0版本的nginx更新了許多新功能,例如 stream 四層代理功能,伴隨著 nginx 的廣泛應用,版本升級必然越來越快,線上業務不能停,此時 nginx 的升級就是運維的工作了
nginx 方便地幫助我們實現了平滑升級。其原理簡單概括,就是: (1)在不停掉老進程的情況下,啟動新進程。 (2)老進程負責處理仍然沒有處理完的請求,但不再接受處理請求。 (3)新進程接受新請求。 (4)老進程處理完所有請求,關閉所有連接后,停止。 這樣就很方便地實現了平滑升級。一般有兩種情況下需要升級 nginx,一種是確實要升級 nginx 的版本,另一種是要為 nginx 添加新的模塊
Nginx信號簡介
主進程支持的信號
工作進程支持的信號
3、nginx 平滑升級實戰
1、查看現有的 nginx 編譯參數
[root@nginx-server ~]# cd /usr/local/nginx/sbin/nginx -V按照原來的編譯參數安裝 nginx 的方法進行安裝,只需要到 make,千萬不要 make install 。如果make install 會將原來的配置文件覆蓋
[root@nginx-server ~]# cd /usr/local/nginx-1.16.0/ [root@nginx-server nginx-1.16.0]# ./configure --prefix=/usr/local/nginx --group=nginx --user=nginx --sbin-path=/usr/local/nginx/sbin/nginx --conf-path=/etc/nginx/nginx.conf --error-log-path=/var/log/nginx/error.log --http-log-path=/var/log/nginx/access.log --http-client-body-temp-path=/tmp/nginx/client_body --http-proxy-temp-path=/tmp/nginx/proxy --http-fastcgi-temp-path=/tmp/nginx/fastcgi --pid-path=/var/run/nginx.pid --lock-path=/var/lock/nginx --with-http_stub_status_module --with-http_ssl_module --with-http_gzip_static_module --with-pcre --with-http_realip_module --with-stream --with-http_image_filter_module [root@nginx-server nginx-1.16.0]# make3、備份原 nginx 二進制文件
備份二進制文件和 nginx 的配置文件(期間nginx不會停止服務)
[root@nginx-server nginx-1.16.0]# mv /usr/local/nginx/sbin/nginx /usr/local/nginx/sbin/nginx_$(date +%F)4、復制新的nginx二進制文件,進入新的nginx源碼包
[root@nginx-server nginx-1.16.0]# cp /usr/local/nginx-1.16.0/objs/nginx /usr/local/nginx/sbin/5、測試新版本的nginx是否正常
[root@nginx-server nginx-1.16.0]# /usr/local/nginx/sbin/nginx -t6、給nginx發送平滑遷移信號(若不清楚pid路徑,請查看nginx配置文件)
[root@nginx-server ~]# kill -USR2 `cat /var/run/nginx.pid`7、查看nginx pid,會出現一個nginx.pid.oldbin
[root@nginx-server ~]# ll /var/run/nginx.pid* -rw-r--r-- 1 root root 5 Jul 1 11:29 /var/run/nginx.pid -rw-r--r-- 1 root root 5 Jul 1 09:54 /var/run/nginx.pid.oldbin8、從容關閉舊的Nginx進程
[root@nginx-server ~]# kill -WINCH `cat /var/run/nginx.pid.oldbin`9、此時不重載配置啟動舊的工作進程
[root@nginx-server ~]# kill -HUP `cat /var/run/nginx.pid.oldbin`10、結束工作進程,完成此次升級
[root@nginx-server ~]# kill -QUIT `cat /var/run/nginx.pid.oldbin`11、驗證Nginx是否升級成功
[root@nginx-server ~]# /usr/local/nginx/sbin/nginx -V4、升級實驗
1、安裝配置1.6版本的 nginx,重新開啟一臺機器
[root@localhost ~]# yum install -y gcc gcc-c++ pcre-devel openssl-devel zlib-devel [root@localhost ~]# tar xzf nginx-1.6.3.tar.gz -C /usr/local/ [root@localhost ~]# cd /usr/local/nginx-1.6.3 [root@localhost nginx-1.6.3]# ./configure --prefix=/usr/local/nginx --user=nginx --group=nginx --with-http_stub_status_module [root@localhost nginx-1.6.3]# make && make install [root@localhost nginx-1.6.3]# useradd -M -s /sbin/nologin nginx [root@localhost nginx-1.6.3]# /usr/local/nginx/sbin/nginx -t nginx: the configuration file /usr/local/nginx/conf/nginx.conf syntax is ok nginx: configuration file /usr/local/nginx/conf/nginx.conf test is successful [root@localhost nginx-1.6.3]# /usr/local/nginx/sbin/nginx [root@localhost nginx-1.6.3]# netstat -lntp Proto Recv-Q Send-Q Local Address Foreign Address State PID/Program name tcp 0 0 0.0.0.0:80 0.0.0.0:* LISTEN 13989/nginx: master2、查看版本和模塊
[root@localhost nginx-1.6.3]# /usr/local/nginx/sbin/nginx -V nginx version: nginx/1.6.3 built by gcc 4.8.5 20150623 (Red Hat 4.8.5-36) (GCC) configure arguments: --prefix=/usr/local/nginx --user=nginx --group=nginx --with-http_stub_status_module [root@localhost nginx-1.6.3]# echo "nginx1.6" > /usr/local/nginx/html/index.html [root@localhost nginx-1.6.3]# yum install -y elinks4、訪問驗證
[root@localhost nginx-1.6.3]# elinks 10.0.105.189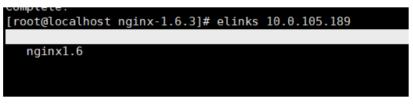
5、升級nginx
將 nginx 版本進行升級 并在不影響業務的情況下添加 SSL 和 pcre 模塊
[root@localhost ~]# tar xzf nginx-1.12.2.tar.gz -C /usr/local/ [root@localhost ~]# cd /usr/local/nginx-1.12.2/ [root@localhost nginx-1.12.2]# ./configure --prefix=/usr/local/nginx --user=nginx --group=ngiinx --with-http_stub_status_module --with-http_ssl_module --with-pcre [root@localhost nginx-1.12.2]# make [root@localhost nginx-1.12.2]# cd [root@localhost ~]# mv /usr/local/nginx/sbin/nginx /usr/local/nginx/sbin/nginx_lod [root@localhost ~]# cp /usr/local/nginx-1.12.2/objs/nginx /usr/local/nginx/sbin/ [root@localhost ~]# mv /usr/local/nginx/conf/nginx.conf /usr/local/nginx/conf/nginx.conf.bak [root@localhost ~]# kill -USR2 `cat /usr/local/nginx/logs/nginx.pid` [root@localhost ~]# ls /usr/local/nginx/logs/ access.log error.log nginx.pid [root@localhost ~]# ps aux | grep nginx root 13989 0.0 0.0 24860 952 ? Ss 13:55 0:00 nginx: master process /usr/local/nginx/sbin/nginx nginx 13990 0.0 0.1 25284 1720 ? S 13:55 0:00 nginx: worker process root 16525 0.0 0.0 112708 976 pts/2 S+ 14:09 0:00 grep --color=auto nginx16、nginx 錯誤頁面配置
nginx錯誤頁面包括404 403 500 502 503 504等頁面,只需要在server中增加以下配置即可:
#error_page 404 403 500 502 503 504 /404.html; location = /404.html { root /usr/local/nginx/html; }注意:
/usr/local/nginx/html/ 路徑下必須有404.html這個文件!!!
404.html上如果引用其他文件的png或css就會有問題,顯示不出來,因為其他文件的訪問也要做配置; 為了簡單,可以將css嵌入文件中,圖片用base編碼嵌入;如下:
[root@localhost html]# vim 404.html ta charset="UTF-8" /> ta name="viewport" content="width=device-width, initial-scale=1, maximum-scale=1" /> 404 "layui-layout-body"> "layui-layout layui-layout-admin"> "layui-body"> "layout-table"> "layout-table-cell">  "layout-img">
 "layout-tip">哎呀,找不到該頁面啦!
"tips">請檢查您的網絡連接是否正常或者輸入的網址是否正確
展示效果;
轉自:知乎千鋒云計算學院

王同一